How To Turn Off Water to Toilet: Complete Guide
Turning the water off is an essential part of the process if something goes wrong with your toilet or if you need to do an inspection or perform some repairs. If you don’t turn off the water, you’ll likely have a pretty messy mishap.
Turning off the water to a toilet involves locating the toilet shut-off valve, turning the lever until the valve cuts off the water supply, and checking to ensure the water is off by flushing the toilet.
This article is a thorough guide to how to turn off the water to a toilet. If you need to do some plumbing work but are unsure how to take this initial step, keep reading!
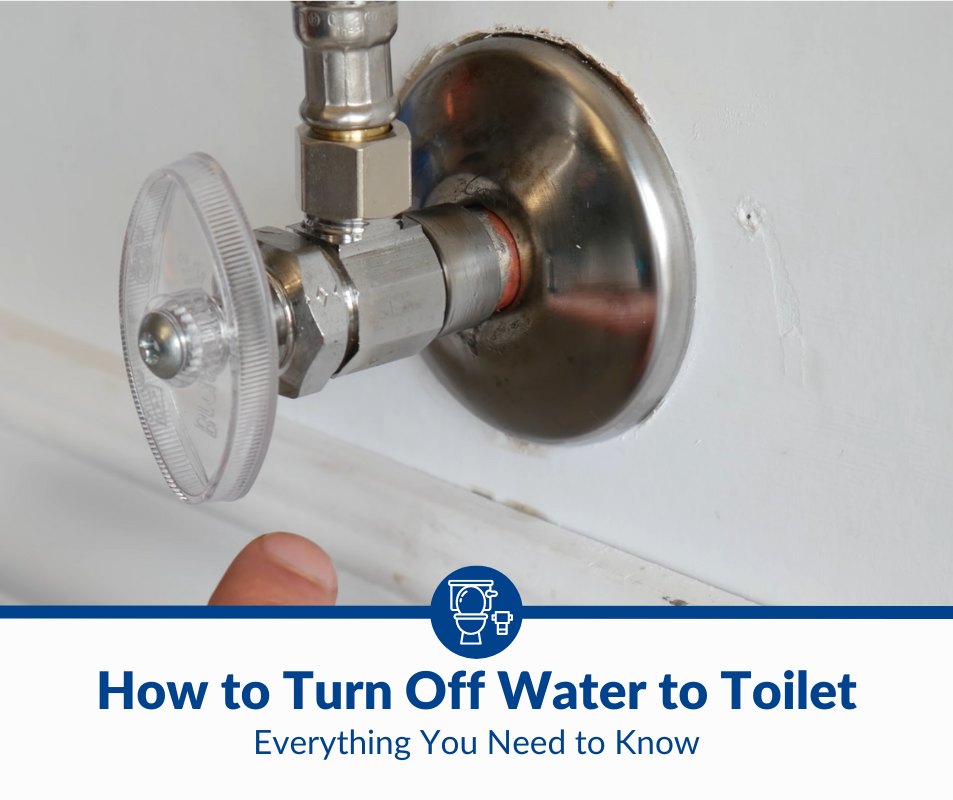
1. Locate the Toilet’s Shut-Off Valve
The first step to turning the water off to a toilet is locating the shut-off valve. Shut-off valves are usually located on the bottom left of a toilet unit. Look for a pipe coming from the bottom of the tank and connecting to the wall or floor. Where that pipe connects to the wall or floor is usually where you’ll find the shut-off valve, which typically has a football-like shape.
Once you locate the water shut-off valve, you’re well on turning off the water to your toilet, and you can continue to the next step.
2. Turn the Shut-Off Valve
To close off the water supply and stop it from reaching the toilet, you’ll need to turn the valve clockwise for at least a quarter turn. In most cases, a quarter turn is enough to turn off the water, but you should keep turning until the valve tightens.
Turning the valve should be easy, and you shouldn’t need additional tools like a wrench. If you’re struggling to turn the valve, you may need to replace it.
If you notice rust accumulating on the valve, I recommend spraying it with a lubricant spray before attempting to turn it. I suggest the WD-40 Specialist Silicone Lubricant from Amazon.com because the spray provides a protective, low-friction coating to many surfaces, including metal. I also like that it is a quick-drying formula that cures into a clear hard film that prevents further rusting.
Some older toilets and homes don’t have specific shut-off valves for the toilet itself, so you’ll need to turn off the water supply to the entire home.
If you don’t know where your main water shut-off valve is, now is the time to learn! Knowing where this is located in your home is always best, so you don’t have to find it quickly in an emergency situation.
In many cases, the main water shut-off valve is in the basement or crawl space, if you have one. If your home was built on a slab, it could be inside your garage. In rare cases, the valve is outside the home near the front curb and buried underground in a cement box.
Suppose your main water supply is outside. In this case, you should look for a rectangular or round cover near the front curb of your home, usually between the curb and the sidewalk. Most outdoor water supply boxes are labeled with “water” or “water meter” or something similar. Once you locate the box, remove the cover to find the main water shut-off valve inside.
Main water valves are usually gate valves or ball valves. Gate valves have a wedge-shaped metal gate that you can lower or raise with a twist-type handle or knob. Ball valves have a sphere with a hole that you can lower or raise with a lever. When the valve is open, the hole aligns with the water flow to go through uninterrupted.
Once you locate the valve, turn it clockwise to shut off the water supply. Just remember that if you have to shut off the main valve, you won’t get any water into your home, so you won’t be able to use the sinks or take showers until you turn the water back on.
3. Check To Ensure the Water Is Off
Check to ensure the water is off before you proceed with your inspection or maintenance. The best way to check is to flush the toilet. The toilet bowl should be empty of water like it normally does, but it shouldn’t refill. If the toilet bowl refills, you didn’t completely turn off the water valve, and you should try again.
Another way to check and see if the water is turned off is to lift the float lever in the tank. When you look in the toilet tank, you should notice a hollow, sealed float on top of the water with a lever attached to it. If you push that lever down and more water comes into the tank, you didn’t turn the water off completely.
4. Turn the Water Back On
Once you’ve completed all the necessary repairs and inspections, you’ll need to turn the water back on before you start using the toilet again. To do this, simply turn the valve lever counterclockwise to unseal the valve.
Check to see if the water is turned back on by flushing the toilet. If the toilet bowl empties and then refills, you’ve successfully turned the water back on and can start using the toilet again.
You can keep the water to your toilet off as long as you need to repair the toilet or perform an inspection. Keeping the water off doesn’t harm or damage the toilet, so you aren’t risking your appliance by doing so. However, do keep in mind that you won’t be able to flush the toilet normally as long as the water supply is off. If you do need to flush the toilet for whatever reason while the water is turned off, follow these steps:
- Fill a bucket of water with a gallon of water.
- Pour the water into the toilet bowl until the pressure from the water forces the contents in the toilet to go through the pipes.
- If everything doesn’t go down the pipes on the first try, continue refilling the toilet bowl with water until you’re happy with the results.
How To Turn Off Water to Toilet Without Using the Valve
If you want to turn off the water without messing with the water shut-off valve or the main water valve, you have one other option. Follow these steps:
1. Remove the Tank Lid and Locate the Ballcock
The ballcock is the part of the toilet that enables the filling of the tank without it overflowing. The ball attached to the ballcock assembly floats on top of the water in the tank and drops when the water level drops, which triggers the valve’s lever and allows water to come into the tank.
Once you’ve found the ballcock assembly and the floating ball on top of the water, you can continue to the next step.
2. Slip Something Underneath the Float Ball
Suppose the float ball falling triggers the lever to open up and allow water to flow into the tank. In that case, preventing the float ball from sinking with the dropping water level will prevent the lever from being triggered in the first place and stop water from flowing inside the tank.
Therefore, you’ll need a way to stop the floating ball from falling. One way is to slip something underneath the ball that holds it up. One of the most effective things is a small piece of wood.
For this task, I recommend these Bright Creations Unfinished Wood Blocks from Amazon.com. I like these squares because they are a good thickness for holding up the ballcock float and are not too big to fit inside the tank. I also like that this purchase comes with four blocks, so you can use more than one if necessary, and you can keep the extra for another craft or job.
3. Empty the Tank
Once the float ball is held up by something, try flushing the toilet to see if the toilet bowl refills. If you’re successful, the tank should be empty without any refilling. After you’re done working on the toilet, remove the wood piece to allow the float ball to trigger the valve again.
How To Replace a Toilet Valve
Many homeowners notice some sort of problem with their toilet water shut-off valve while turning off the water supply to their toilet. If this is the case, it might be time to replace the toilet valve. While this task requires some technical skill, you should be able to do it on your own and save money by avoiding a plumber.
Fill valves need replacement every once in a while because they get worn out or knocked out of alignment. If you notice water leaking out of your toilet or the toilet water continues to run for a while after flushing, it may be time to replace the valve. Follow these steps:
- Turn off the water by turning the main water supply shut-off valve clockwise until you can’t turn it anymore.
- Drain the water supply line, so it doesn’t spill out when you remove it and make a mess.
- Place a bucket underneath the supply line to catch any water that didn’t come out during step 2.
- Use a wrench to remove the bolt that attaches the supply line to the valve. I suggest using a crescent wrench, such as one of these HORUSDY 4-Piece Adjustable Wrenches from Amazon. I like these wrenches because they are made of high-quality chrome vanadium steel and heat-treated, so they’re extremely durable and will likely last a long time. I also like that their precision-made jaws have laser-etched scales.
- Disconnect the supply line from the valve. This should be easy to do after removing the bolt in step 4.
- Install the new valve by sliding a compression nut into the pipe and pushing the compression ring on the tube.
- Slide the new valve over the pipe.
- Tighten the compression nut by hand at first, then with the wrench.
- Thread a compression nut into the valve output to attach the toilet supply line to the new valve.
- Ensure all nuts and bolts are completely tight.
- Turn on the main water supply again and check to ensure that the water is flowing properly and the toilet tank refills after flushing.
Ensuring that your valve is in good condition is a great way to prevent leakage and high water bills due to a constantly running toilet.
How To Fix a Running Toilet
One of the main reasons why one might need to turn off the water to a toilet is because the toilet won’t stop running, and they don’t know how else to address the issue. Let’s look at some common reasons why a toilet continues to run after flushing and how to fix the problems.
One reason why a toilet may continue to run after flushing is that the toilet handle is stuck. If the handle is jammed, the floating ball part of the ballcock system won’t rise, and the valve will get continuously triggered and keep sending water through. To fix this issue, you may need to replace the handle entirely. Here’s how:
- Turn off the water supply by following the directions above.
- Flush the toilet to drain the toilet tank.
- Use a screwdriver to unscrew the toilet handle.
- Replace the handle with a replacement. You can get a replacement toilet handle from a plumbing parts store or online. I recommend the Qualihome Handle Lever Flush Replacement from Amazon because it has a sleek appearance and comes with a complete kit, including the handle itself, a reverse thread lock nut, and a pre-drilled rod. I also appreciate that the handle doesn’t require too much pressure to flush.
Another possible explanation for a running toilet is that the water pressure is too high for your toilet. If you have a modern toilet, this shouldn’t be the problem, but some older toilets can’t handle high water pressure and keep running after they’re flushed. You can install a pressure-reducing valve (or pay someone else to install it) to address this problem. Here’s how to do that:
- Attach a pressure gauge to the pressure-reducing valve.
- Hold the valve against the water pipe and mark the position where the valve is, so you know how much of the water pipe to remove.
- Turn off the water to the house.
- Drain the water from the plumbing system.
- Use a tubing cutter to remove as much water pipe as necessary.
- Remove the O-rings and the pressure gauges.
- Solder the valve to the water pipe.
- Wait at least twenty minutes for everything to cool down.
- Reinstall the O-rings and the pressure gauges.
- Turn the water back on.
- Flush the toilet to ensure that you’ve installed everything properly.
The pressure-reducing valve decreases the amount of pressure the water has when it comes into the toilet, which reduces the chances of the toilet continuing to run after flushing because the toilet will return to normal function.
You’ll need to check your water system to see what kind of valve you need, but I highly recommend the Bell&Gossett Pressure Reducing Valve from Amazon. This valve is made with high-quality and long-lasting brass, and I like that it is a standard valve that fits many pipes and water systems. I also like that you can adjust the pressure according to your preferences.
A final reason a toilet might continue to run after flushing is that the refill tube isn’t the right size. Usually, toilet refill tubes are the right size for the toilet, but if you’ve just gotten your toilet repaired or tried to insert or replace a refill tube, the tube might not be the right size.
The best way to check if this is the issue is to measure the refill tube. First, measure the length of your toilet tank, and then use a ruler to measure the refilling tube from the end of the toilet to where it meets the toilet bowl. These two measurements should be the same. If they’re not, then your refill tube is likely the issue. If the tube is too long, you can cut it down to size; if it’s too short, you’ll need to purchase a new one from a plumbing store or online.
I recommend the Fluidmaster Tube and Clip Replacement from Amazon because it is extremely durable, so it’ll last a long time, and you can cut it to fit your toilet. I also like that it is easy to install, and it fits on almost all fill valves on standard toilets.
Final Thoughts
Turning off the water to a toilet is a necessary task if you want to do any inspections or repairs on your toilet. Luckily, it is a relatively straightforward task that typically just involves locating the water shut-off valve, turning the lever clockwise until the water supply is cut off, and checking to ensure you’ve successfully turned off the water by flushing the toilet. To turn the water back on, you must turn the lever on the valve counterclockwise.