Toilet Shims: How to Shim a Toilet
As you sit and do your business, you may have noticed the toilet wobbling a bit. Chances are, your floors are uneven and you’ll need to shim the toilet.
You can shim a toilet by first looking at the empty space underneath the toilet and then inserting plastic toilet shims in these gaps. Afterward, trim the parts of the shim that are sticking out and seal the area.
That way, you can go about your business in peace. Stick around for a more detailed guide on how to shim a toilet.
8 Steps to Shim Your Toilet
The good news is that shimming a toilet is a relatively easy job. Nevertheless, before you decide to shim it, we recommend getting a plumber first.
They can inspect your toilet to check if there are any underlying issues in the flange or wax seal that are causing your toilet to move unsteadily. Alternatively, you can also complete the job on your own after reading our comprehensive guide below.
Step 1: Prepare Your Tools
To get started, you’ll want to prep the tools.
- Toilet Shims
- Utility Knife
- Paper Towel
- Caulk
- Wrench
- Level Tool
- Masking Tape
When it comes to shims, you can opt to make your own made out of wood, or purchase rubber or plastic options.
Rubber Toilet Shims
Rubber toilet shims are a highly durable choice and are able to effectively hold large weights due to their flexibility. The only downside is that you may need to use more of them since they tend to bend.
Plastic Toilet Shims
Plastic toilet shims, like rubber ones, are a reliable option. On top of that, they’re available in multiple colors and sizes.
Aside from that, plastic can crack after being exposed to temperature changes in the bathroom, especially if you have a heater.
Wood Shims
Despite being a strong choice, wood shims can easily deteriorate over time from water exposure. Plus, the humidity in the bathroom won’t make things any better.
Step 2: Inspect the Toilet
After gathering your tools, take a good look at your toilet. Go around the base of the bowl to check for any gaps.
You can then examine the level of the toilet by placing your tool on top of the toilet tank. Raise the tool until the bubble is in the middle.
Afterward, check the distance between the toilet tank’s surface and the level’s bottom. This area will allow you to determine how out of level the toilet is and how many shims you’ll need.
Nonetheless, before installing the shims, you need to do a flush check. If there’s a leakage then your wax ring under the toilet is likely damaged. Consequently, you’ll need to replace it, which will be discussed in more detail below.
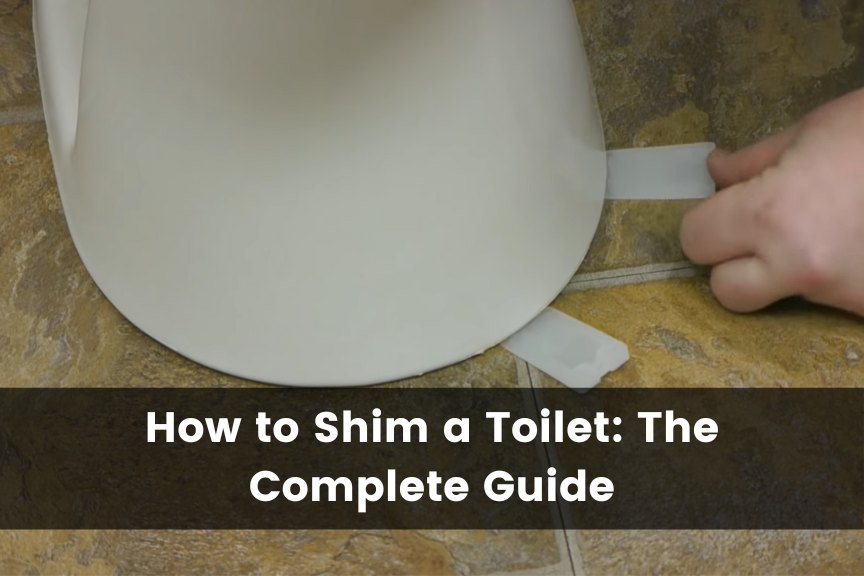
Step 3: Install the Toilet Shims
In this step, you’ll get your shims and jam them in the empty spaces under the toilet. You can use handmade wood shims or commercial plastic and rubber options as well.
The pointed edge part should face the toilet. We suggest using your fingers to push and secure the shim in there.
Alternatively, you can use a hammer to shove the shims in, but it could risk leveling up the toilet more than you want.
After installing all your shims, test the stability of your toilet by moving it. If it’s not going anywhere, you did a good job. If it’s still wobbly, then try to add more shims in the remaining empty spaces.
Step 4: Hide the Toilet Shims
This step is more cosmetic, where you can trim off the shims. Grab your utility knife and cut off all the excess pieces poking out of the toilet’s base.
Try to avoid damaging the flooring underneath the knife by using a right angle as you move the knife. In other words, let the bowl guide your knife, and don’t use too much pressure.
Step 5: Double-Check the Toilet
Once the shims are trimmed, you’ll want to do another shake trial to test the toilet’s stability. Be sure to move it around from all possible angles.
In addition to this, flush the toilet a couple of times to make sure the bottom doesn’t leak. Shimming the toilet shouldn’t impact your toilet’s function.
Step 6: Caulk and Seal the Toilet’s Base
If the toilet is good to go, you can begin caulking the area to hide to shims and fill in any gaps around them.
Firstly, use paper towels or a rag to wipe off any excess residue from the trimmed shims. Next, apply masking tape all around the base so the caulk doesn’t spread to your floor.
Then, squeeze out a thin layer of caulk around the bowl. You can use your fingers to shape the caulk more evenly around the base.
Make sure to leave a small area open near the back of the toilet. This is to help you detect any possible leaking issues.
If the area is completely sealed, then the water leakage will only accumulate in the base and you’ll be dealing with a bigger issue.
Why Caulking Matters
Caulking around the area after shimming is a crucial step. It’s even stipulated in the International Plumbing Code. The material helps stabilize the toilet bowl as well.
Caulking also hides the shims from view so your toilet looks clean and evenly colored. It also helps smoothen the area out.
Step 7: Allow Caulk to Cure
After caulking the toilet base, you can’t let anyone use the toilet until the caulk is cured. Most caulks can take around a day to cure. Nonetheless, check the caulk’s label for a more precise time frame.
Step 8: Final Test
With the shims installed and the caulk cured, your toilet should undergo another stability test. You can do it after a couple of days of this process.
If the toilet bowl is still moving around, then you may not only be dealing with an unlevel floor.
Why Should You Fix a Wobbly Toilet?
Although the toilet is functioning fairly well, you need to watch out for that wobble. When the bowl is out of level it can cause:
Floor Damage
The weight of your toilet rocking back and forth can cause floor damage. On top of the jostling, the leaks could also degrade your floor.
In more serious cases, the floor joists around the toilet could weaken. Consequently, it can compromise your whole bathroom floor structure.
Leaks
The wax seal underneath the toilet bowl may be compromised and can leak waste-contaminated water. On top of bringing a smelly mess, the leakage will plague your bathroom with bacterial growth.
Ceiling Damage
If your toilet is above a basement or on the second floor then the leakage could reach the ceiling under it. In turn, the ceiling could also experience water damage.
Why You May Have an Unleveled Toilet
After knowing why shimming a toilet is critical and how you can do it, it’s time to know why the toilet is unlevel in the first place. That way, you can try to avoid this issue in the future.
Unlevel Floor
The first culprit you’ll want to inspect for an unlevel toilet is an unlevel floor. All you have to do is bust out the level tool and check your bathroom floor.
Unleveled bathroom floors are more predominant in older homes. That being said, leveling the floors is an expensive ordeal.
For this reason, you’re better off shimming your toilet for a fraction of the cost.
Flange Issues
The flange is a round metal bracket found between the toilet bowl and the floor. It connects the bowl with the sewer pipe poking out of the floor.
Now, floor flanges are susceptible to rust and breakage which causes leakage. The damaged flange could be wobbling your toilet as well.
In this case, the solution is to take out the toilet and replace the flange. You may want to leave this job to a professional.
Loose Bolts
The problem could be as simple as loose bolts. All you have to do is to scour your toolbox for a wrench and tighten your bolts.
How to Fix a Wobbly Toilet
Even after inserting toilet shims around the base, you may still notice the toilet wobbling. In this case, it could be a flange or wax seal issue. Here’s how you can solve this problem.
Step 1: Prepare Your Tools
Since you’re going to replace the flange and wax seal, it’ll involve more steps and tools than simply shimming a toilet. Here’s what you’ll need.
- Wrench
- Plunger
- Screwdriver
- Scraper
- Flange Replacement
- Flange Bolts
- Bowl
- Silicone or Wax Ring
- Bucket
- Paper Towels
- Garbage Bag
- Disposable Gloves
- Tarp
- Sponge
- Saw
Step 2: Turn the Water Supply Off
First off, turn the knob behind the toilet clockwise to turn the water supply off. It should be the one nearest to the floor on the left side of the unit.
Next, you’ll want to flush and empty the toilet bowl. If there’s still water in the bowl, use a plunger to push it down the sewer drain. Otherwise, you can also use a sponge to manually get rid of any remaining water.
Lastly, screw off the water supply hose from your toilet and place it in a bucket in case any water comes out.
Step 3: Dislodge the Toilet Unit
This step will involve removing the toilet. To keep your floor safe, lay down a tarp. Then, unscrew the bolts connecting the tank to the bowl. There’s usually a bolt on each side of the tank, but you may also find one in the middle.
Next, gently lift the tank away from the bowl and place it aside. Now, it’s time to detach the toilet bowl. Use your flathead screwdriver to pluck off the bolt caps on the base of the toilet.
Afterward, unscrew the bolt with the wrench and keep them aside for later use. Try to be gentle to avoid chipping or fracturing the porcelain.
That being said, if you have any caulking done around the base, use a utility knife to separate it from the floor. Finally, rock the toilet bowl until it’s completely detached and set it on its side on the tarp earlier prepared.
Step 4: Take the Wax Layer Off
You should now be looking at a wax seal and flange surrounding the sewer pipe. By this time, you may be met with a pungent odor.
We suggest using the towel to stick it in the hole to prevent the toxic smell from spreading too much while you work. Plus, it’ll help you avoid losing bolts or screws in the drain.
Having said that, get the scraper and scuff the wax seal from the base of the toilet unit off into a bowl. In addition to this, remove the wax seal from around the flange area.
Step 5: Remove the Flange
The flange should be fully visible now. If it’s a gasket-sealed PVC flange, then screw the bolts off and set them aside if they’re still in good shape.
Afterward, separate the flange from the sewer pipe and dispose of it. On the other hand, you may have a metal or glued-on flange. In this case, calling a plumber would be best.
If you try to do it on your own, you’ll risk damaging the main pipe, which is a considerably more costly repair.
Step 6: Secure the New Flange
To find the right flange, you can measure the diameter of the pipe and get your replacement. On the other hand, if the old flange is still intact, you may take it to the repair shop with you.
Having said that, remove the towel plug and install the flange in place. Make sure the material is in line with the toilet unit. Use washers and nuts when screwing the new flange.
You don’t need to glue the flange if it’s a gasket-sealed PVC one.
Step 7: Add the Wax Seal
After centering the flange and securing it, apply the wax ring around it. That being so, you can go about this step differently.
Instead, attach the wax ring to the toilet unit base. This method is more beneficial since it guarantees the ring will be in the right position when setting the bowl back in place.
Step 8: Set the Toilet Bowl Back
Once the flange and wax ring are in place, lift the toilet bowl unit up and carefully set it down. Make sure it’s correctly situated where the bolt holes are.
When lifting the bowl, hold it from its inner rim so it feels more secure in your hands. After the bowl lands, put some pressure so the wax seal can properly set.
Don’t move the bowl side to side or else you risk damaging the seal and having to start all over again.
Step 9: Screw the Toilet Bowl in Place
With your wrench, screw the bolt and washer on either side of the toilet bowl. Make sure to avoid overtightening the washers to prevent any cracks or chips from forming on the bowl.
Then, saw off the protruding bolt and place the bolt caps back on top.
Step 10: Place Everything Back in Place
In the final step, you first place the tank and screw it back in place. Attach the water supply pipe back.
Turn the valve for the supply back on so the bowl fills back with water. Make sure there isn’t any leakage around after flushing the toilet and that’s it!
Other Uses for Toilet Shims
The toilet isn’t the only place you can use your shims for. Other units in the bathroom can also benefit from toilet bowl shims such as:
- Bathroom Vanities: If your vanity is wobbling like your toilet, you can use the same fix method.
- Washing Machines: Plastic and rubber toilet shims can help keep your appliance steady. Be sure to avoid wood shims since they can rot from water exposure.
- Bathtub: During a bathtub installation, shims make everything snug to avoid any empty spaces around the tub. We recommend using a rubber option here.
FAQs
What can I use instead of toilet shims?
You can use coins or washers. They offer several thickness options and are equally firm.
Should a toilet be caulked to the floor?
Yes, caulking a toilet to the floor helps prevent toilet issues and keeps the toilet bowl secure.
Can you shim a toilet with wood shims?
Yes, you can. Plus, you can make them.
Should I glue shims?
For toilet shims, it may not be necessary since you will caulk the region.
How much weight can a toilet shim hold?
Shims can hold around 2000 to 5000 lbs of pressure.
Conclusion
An unlevel toilet can pose several risks from waste-water leakage to floor damage. Luckily, shimming can help prevent some of these issues by keeping your toilet bowl steady.
The process is also simple. You just need to get the shims, insert them in the base’s gaps, caulk around the shims and you’re done.
We hope this article will guide you well. Keep in mind that if the process is too difficult, you can always ask for a plumber’s assistance.